One of my many hobbies (I have a total of two) is photography. I enjoy it a lot, but I still have a lot to learn and practice. One of those things is editing photos properly.
Photoshop Fun
One program I use to edit photos is photoshop. Photoshop is really helpful for more extensive changes to a photo, like if you want to retouch a portrait or change the direction of shadow or even making someone appear to be in a cloud (nudge nudge wink wink). And that’s just the tip of the iceberg.
The Start Of it All
Last year in photo club my friend Joey and his friend Josh were messing around and jumping onto a pole vaulting mat that was left out. I asked them to jump towards me that way I can use a fast shutter to capture them mid-air. I got this funny photo of Josh resting on the mat and I got an idea for a funny photo.
His position reminded me of that Katy Perry album cover (the one where she’s lying butt-naked in what I thought was a cloud but apparently it’s cotton candy) so I uploaded the photos to lightroom (another photo editing program by adobe) and then opened that photo and one of a cloud I took in photoshop. This was my first time using photoshop, so I asked Mrs. Olden for help and she gladly assisted me on my masterpiece. After a while I finally finished and had created “Joshy Perry”. It featured my friend josh in a cloud that I had changed to a hot pink color. The best part was that he wasn’t embarrassed at all when I showed it to every human being within a 10 mile radius. Here’s the finished masterpiece: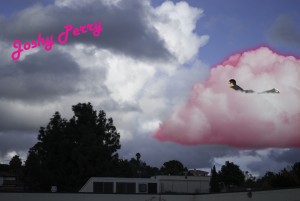
And So It’s Continues
This year, I’ve made a personal goal to put as many people in variously colored clouds as I can. I’ve put my friend Wendy, Kiana, Joey, Isaac, and Hillary Clinton. Hopefully by the end of the year I will have a cloud photo for almost everyone I know.
Let Me Show You How it’s Done
First step is always to find someone who is okay with me putting them in the cloud. Most people are okay with it, but it’s still important to make sure they’re comfortable with it. Next I have my model stand/lay/sit in various poses, that way I have different options when I get started photoshopping. Next I find a photo of a cloud I like, or I take a new one if there are any nice looking cloud formations outside. I usually take a bunch of photos when there are clouds, that way I can stock up on cloud photos for later projects. Then I edit both photos in lightroom, making small adjustments to each photo, that way I can get straight to the point in photoshop.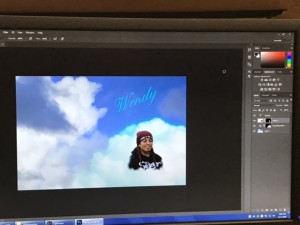
Once I open the photos in photoshop I select the move tool and move the photo of my subject (Wendy in this example) and I drag it to my cloud photo. Before I drop the photo to the other window I press and hold shift that way the photos stay at the same dimensions. Next I resize the photo of Wendy to the size I want her to be. Using the select tool I select all of Wendy. Once i’m happy with my selection I create what’s called a ‘layer mask’. I’m honestly not sure what a layer mask is, but it makes everything in the photo of Wendy that I didn’t select disappear. Now I resize Wendy again if it’s needed, then I use white and black brush on the layer mask to make some of Wendy disappear that way she looks immersed in the clouds. A key step for this is to make sure you’re drawing on the layer mask and not any of the other layers. Once i’m happy with the way it looks I click the hue/saturation button (still on the layer mask). A menu should pop up and give the option to change the saturation, color, and darkness. After the final color is set, I click the a button in the upper left hand corner in that menu, it looks like a rectangle with a circle in the center. On this menu, I feather the color to make the hue more believable. Here are my final layers.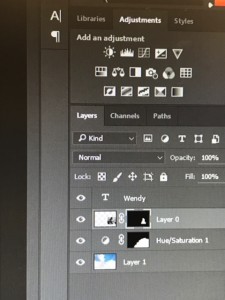
Eventually I end up with this masterpiece:
Moral of my story is that if anyone has ever wanted to be in a cloud, I would be happy to assist.